pumpkin spice cupcakes w/cream-cheese frosting

Well, the Giants got a smack-down last night. It was pretty pitiful.

But Dana and I still had a fun time chowing on deep-dish pizza, catching up {we ended up talking more than watching the game, since the game was so depressing} and playing with her adorable new kittens, Sadie and Hunter! They are so inquisitive, full of energy, and TINY! Here’s a photo I snapped of Sadie cuddled up on Dana’s lap.

sadie

So soft and fluffy! I couldn’t stop petting her.

One good thing about the evening was that at least we had yummy baked goods to help ease our sorrows!

baseball cupcakes

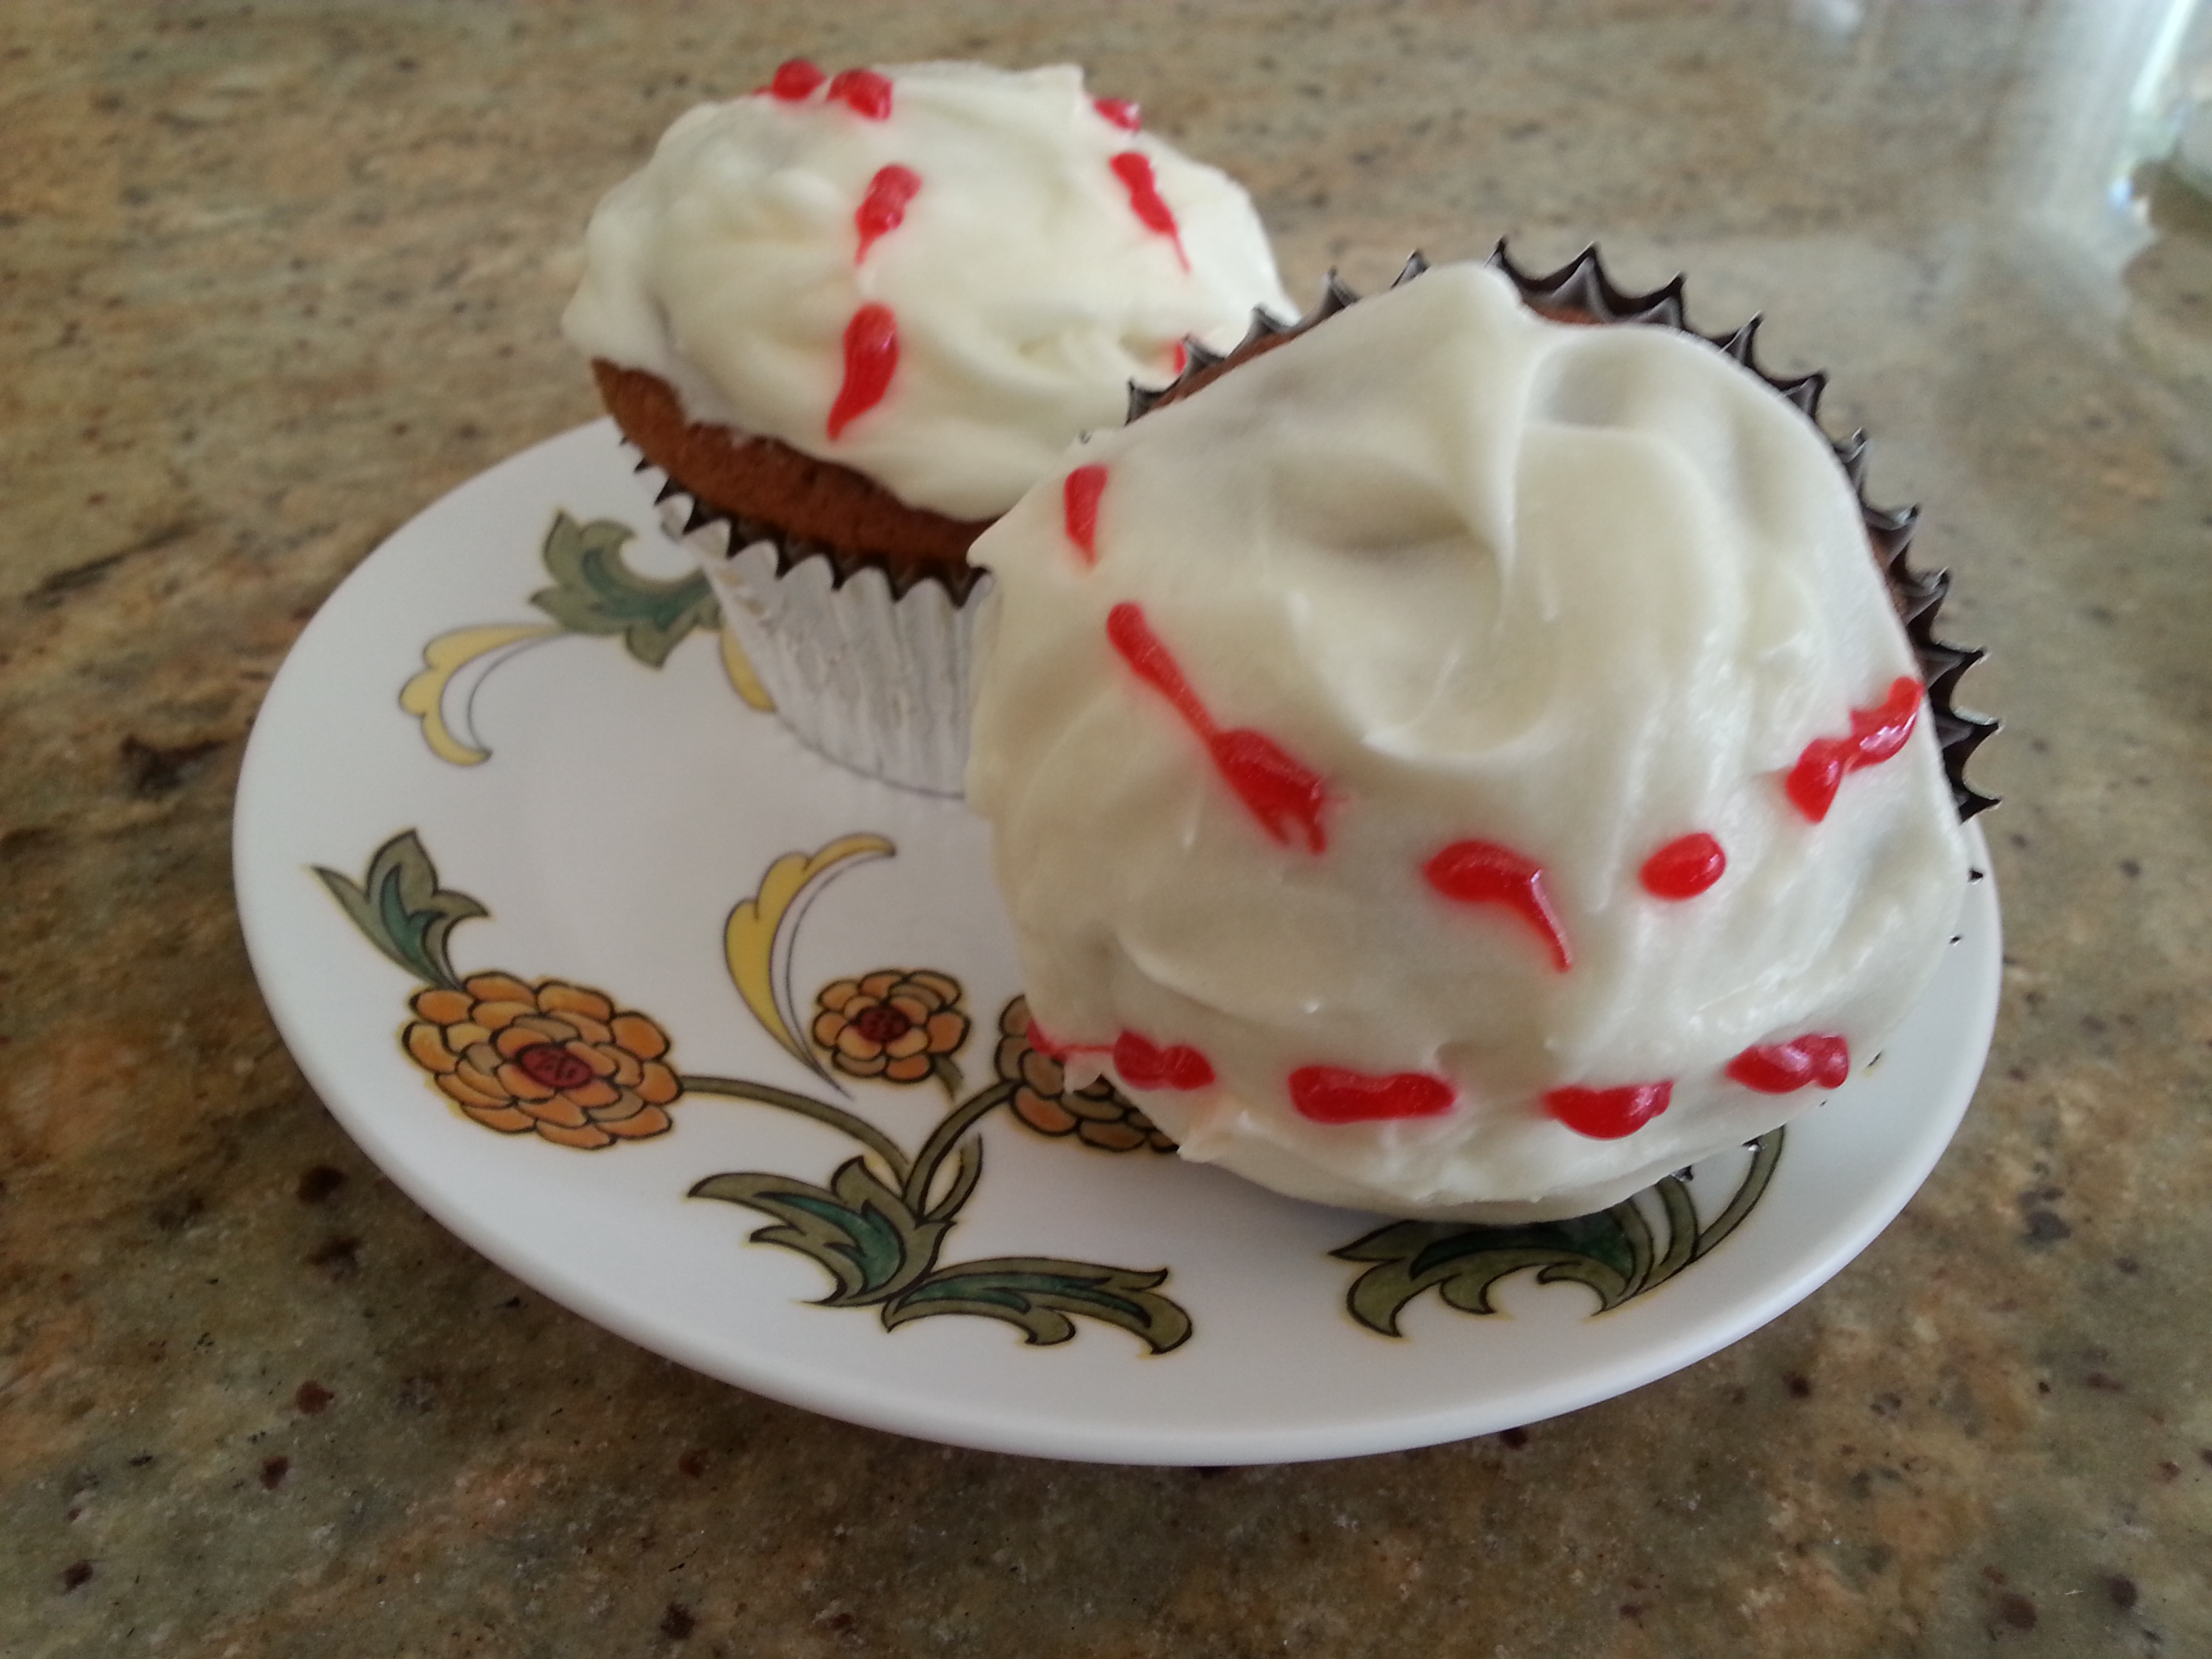
These cupcakes might not have been very lucky, but they sure were delicious! And super easy to make. I got some requests on Instagram for the recipe, so I thought I would share it on here!

My secret weapon: Trader Joe’s pumpkin bread mix. This stuff is amazing! Hands-down my favorite baking mix ever. And it’s seasonal, so stock up while you can!

trader joes pumpkin bread

I’m sure you could use a different pumpkin spice baking mix in a pinch, or make pumpkin muffins from scratch — here’s a recipe I love from Snixy Kitchen.

pumpkin spice cupcakes w/cream-cheese frosting

– 1 package Trader Joe’s pumpkin bread mix
– 2 eggs
– 1 cup water
– 1/2 cup vegetable oil
– 4 oz cream cheese, softened {I used 1/3 reduced-fat kind}
– 1/4 cup butter, softened
– 1 & 1/2 cups powdered sugar

1. Preheat oven to 400 degrees F.

2. In a large bowl, combine baking mix, eggs, vegetable oil and water. Mix until well combined.

3. Pour batter into a muffin tin lined with paper cups. In order to make these rounded baseball cupcakes, I filled the cups all the way to the top with batter. If you would like flatter cupcakes, fill the cups 3/4 of the way full.

4. Bake for 18-22 minutes, until a toothpick inserted in the middle comes out clean. Remove cupcakes from the muffin tin and set on a rack to cool.

5. While cupcakes are cooling, make the frosting: using a mixer, beat together the softened cream cheese and softened butter until smooth and well-combined.

6. Slowly add the powdered sugar, combing well after each addition. I used approximately 1.5 cups, but you can increase or reduce the amount depending on desired sweetness.

7. If frosting is too thick, you might need to add a little heavy cream or milk to thin it out, but I love my frosting thick, so I didn’t add any.

8. When cupcakes are completely cool, use a knife to generously spread them with frosting. To make baseballs, use a red gel frosting to make dotted lines in two half-moons, like the threading on a baseball.

baseball cupcakes

ENJOY!

In the meantime, I’ve got my Giants spirit going all day today! Game 7! Let’s go, San Francisco! 🙂

giants spirit

Questions of the day:

  • Are you watching the World Series? Who are you rooting for?
  • What is your favorite autumn dessert?

eggnog cookies w/buttercream frosting

Now that Thanksgiving is over, it is officially beginning to feel like the Christmas season! I saw eggnog at the grocery store yesterday. I am not a straight-up eggnog fan … but eggnog frosting is a different story!

egg nog

When I saw this recipe on Sweat Pea’s Kitchen for eggnog cookies, I immediately printed it out. Don’t let the cookie-and-frosting combo fool you: these cookies look fancy, but they are super easy to make. And I was blown away by how good they are! Even though I do not consider myself an eggnog drinker, I do now admit to being an eggnog consumer — in cookie form! 🙂

eggnog cookies

eggnog cookies {yields one dozen}

for the cookies:
1  & 1/8 cups whole-wheat flour
1/4 tsp salt
1/2 tsp baking powder
1/2 tsp baking soda
1 tsp ground nutmeg
1 tsp cinnamon
1/2 tsp pumpkin pie spice
3/4 cup granulated sugar
6 tbsp unsalted butter, slightly softened
1 egg yolk
1 teaspoon vanilla
1/2 cup eggnog
1-2 tablespoons rum {optional}
for the eggnog buttercream frosting:
1/8 cup softened butter
1/4 cup eggnog {I used pumpkin flavored eggnog}
1 & 1/2 cup confectioners’ sugar
1/4 tsp cinnamon
1/4 tsp nutmeg
1-2 teaspoons rum {optional}

1. Preheat the oven to 300 degrees F. Line a baking sheet with parchment paper and set aside.

2. In a medium-sized bowl, whisk together flour, salt, baking powder, cinnamon, nutmeg, and pumpkin pie spice.

dry ingredients

3. In a large bowl, cream the butter and sugar together. Add the egg yolk and vanilla and beat well. Finally, add the eggnog. Batter will be fairly thin.

cookie batter

4. Add the dry ingredients in increments and mix until well-combined.

5. Drop dough by rounded tablespoons onto the prepared baking sheets, leaving about 3 inches between the cookies. Bake for 20 to 22 minutes.

cookies prebake

6. Allow to cool on the sheets for 2 minutes, then transfer to wire cooling racks to cool completely before frosting.

7. While cookies are baking, make the frosting: butter, eggnog, cinnamon, nutmet and powdered sugar until light and fluffy. Add more eggnog if needed to reach the desired consistency.

8. After cookies are completely cool, ice them with a small spatula or butter knife and sprinkle with ground nutmeg if desired.

eggnog cookies

These cookies are the perfect holiday treat!

you might also enjoy these holiday cookie recipes:
two-ingredient pumpkin spice cookies
aunt elaine’s peanut butter blossoms
mom’s classic chocolate-chip cookies

my favorite. dessert. ever!

Happy Friday, friends! Hope you have something fun planned for this weekend. 🙂 I am getting ready to head to LA this afternoon for my cousin Amanda’s bachelorette party! I am so excited! It will actually be the first bachelorette party I’ve ever attended. I’m looking forward to seeing my cousins and friends and celebrating Amanda’s final days of singledom!

I have a delicious recipe to share with you today! I made this for my dad’s birthday cake on Monday. He loves peanut butter and chocolate, so I took my peanut butter cup brownies and upgraded them to a “brownie-cake” … and the highlight is definitely the homemade peanut butter frosting! This frosting is SO simple to make, and if you like peanut butter, you are in for a treat! I predict you will be licking the bowl. {Or maybe that’s just me!}

pb brownie cake

I will warn you in advance, I didn’t even try to healthify this dessert … I don’t even want to know how many calories/fat/sugar/etc. is in a slice of this! Sometimes you just have to treat yourself, right? But I did just come across this recipe by Lindsay at The Lean Green Bean for healthy sweet potato brownies that I might try using in this recipe in the future! If you try it out, let me know how it goes!

I used my fave boxed brownie mix … Ghiradelli dark chocolate!

brownie mix

I made the batter as directed {if you’re trying to healthify things a little, you could substitute unsweetened applesauce for half of the oil} and poured the batter into a lightly greased 8 x 8 pan. Then I stuck in mini dark chocolate peanut butter cups in a tic-tac-toe pattern.

brownies prebake

Bake at 325 degrees for 45 minutes, or until a toothpick inserted in the center comes out clean.

brownie cake

Once the brownies were cool, I frosted them with homemade peanut butter frosting!

homemade peanut butter frosting
– 1/4 cup butter, softened
– 2/3 cup creamy peanut butter
– 3/4 cup powdered sugar
– 2 tbsp milk {to taste … depending on your frosting consistency preferences!}

1. Mix together the butter and peanut butter until well blended.

butter pb

2. Slowly add the powdered sugar and beat until smooth. Add milk until it gets to desired consistency.

frosting

After frosting the brownies, my final step was sprinkling mini chocolate chips over the frosting layer. Ta da! My favorite dessert ever!

pb dessert

These disappeared from our house in record time!

Thank you also for the sweet birthday wishes! I had a wonderful birthday. My family took me out for dinner and even surprised me with sunflowers! How pretty and happy are these flowers?

bday girl

Thanks also to everyone who took part in my birthday beauty giveaway, and welcome to all our new subscribers! The two randomly selected winners are:
– Big Beauty Basket: Anna Wang
– Travel Beauty Clutch: Jo Tran

I will email you both to get your mailing addresses to send you the prizes!

Happy weekend, everyone! Eat something yummy and spend time with those you love!

MPM-Spring
This post is linked up as part of Menu-Plan Monday!

happy halloween! :)

Hi everyone! Hope you are having a spook-tacular Halloween today! Halloween is Mike’s favorite holiday so we have been celebrating all week month long with pumpkin decorations, listening to Halloween Pandora stations, watching ghost-hunting TV shows and scary movies {that I try not to pay too close of attention to … I am a total wuss when it comes to creepy/scary things!} and of course lots and lots of pumpkin-inspired food. {I will be sharing some of my favorite pumpkin recipes next week for a special Pumpkin Week on this blog — stay tuned!}

Do you like my ghost design?

My Halloween started off on a wonderful note last night when I came home to a package on my doorstep … and when I opened it up, I found the most beautiful bouquet of autumn flowers that my dad had sent to me for Halloween! It was such a sweet surprise! My dad always makes me feel so special and loved. I am a very lucky daughter. Now I get a huge smile on my face every time I look across the living room and see them on the table, brightening up the room!

Today I celebrated by making Halloween-themed cupcakes that I took in as treats for my freshmen students. {As I shared this summer, I tend to grow quite fond of my students and have a tendency of spoiling them with homemade baked goods.}

The best part about these cupcakes is the homemade chocolate frosting. I found the recipe on AllRecipes.com and tweaked it a little bit to use less butter but still taste rich and creamy. This frosting is a guaranteed way to make a box-mix cupcake taste gourmet and super special! These cupcakes could be decorated for any holiday or special occasion. I chose to decorate mine with candy corn for Halloween.

yellow cupcakes with chocolate fudge frosting

– 1 box yellow cake mix {I just used the Kroger brand that was on sale for $1}
– 3 eggs
– 1 & 1/3 cup water
– 1/3 cup vegetable oil or applesauce
– 1/3 cup butter or margarine
– 1/4 cup cocoa powder
– 1 tbsp vanilla extract
– 1 tsp cinnamon
– 3 cups confectioner’s sugar
– 4 tbsp half-and-half
– 1 small package candy corn

1. Preheat oven to 350 degrees. Prepare a cupcake tin with liners and set aside.

2. Bake cupcakes according to package directions. I combined my yellow cake mix with the eggs, water, and oil and beat with a whisk until the ingredients were well combined and the batter was smooth.

3. Fill each cupcake tin 3/4 of the way full and bake for 20-25 minutes, until a toothpick inserted in the center comes out clean.

4. While cupcakes are baking, make the frosting. Melt butter in a small saucepan. Turn off the burner. Add cocoa powder and mix well; then stir in vanilla extract and cinnamon.

5. Pour sugar in to a large bowl. Add the chocolate mixture and the milk and stir until the frosting is smooth and creamy. It will be thick! You can add more milk or half-and-half if you would like it to be thinner.

6. Once cupcakes have cooled completely, frost each one with a generous amount of chocolate frosting.

7. Stick 3-4 candy corn pieces into each cupcake so their tops stick out decoratively.

Here they are all packed up and ready to go for my students!

Inspired by Deme at Fresh Coat of Paint to make use of what you have, I used a striped shirt and vest I already owned to dress up as a pirate. Anyone else using what they already have to dress up? Anyone make a homemade costume? One of my favorite-ever costumes was when I was a little girl, maybe four or five years old, and my dad helped me hand-paint cardboard butterfly wings that we tied to my shoulders with pink shoelaces. It didn’t cost us a single penny and I had so much fun preparing my costume, and when I wore it trick-or-treating I felt like the prettiest little butterfly! I still remember it vividly to this day. One of my favorite parts of Halloween is seeing all the creative, innovative and funny costumes!

Ahoy, matey!

Hope you are having a wonderful Halloween full of creative costumes, fun activities, and yummy treats! What are you doing to celebrate today?

-Dallas

red velvet cupcakes with coconut cream-cheese frosting

I like to bring my students baked goods as a surprise at the end of the term {that is, if they’ve been a good class — which so far, they always have been!} I had an especially wonderful creative writing class this summer so I decided to eschew the usual cookies or brownies for a special treat: homemade Red Velvet Cupcakes with this fabulous coconut cream-cheese frosting you might remember from my carrot cake recipe last month.

{Here are the finished cupcakes all ready to go to class:}

I have made Red Velvet cupcakes to great success from a boxed mix before — I like substituting applesauce for the oil to make them a little healthier while still retaining moistness. I am a big fan of the Duncan Hines Red Velvet boxed cake mix.

If you’re feeling more adventurous, like I was, here’s a recipe I was excited to find on the wonderful site Annie’s Eats to make Red Velvet cupcakes from scratch:

Ingredients:

for the cupcakes
– 2½ cups cake flour
– 1½ cups sugar
– 1 tsp. baking soda
– 1 tbsp. cocoa powder
– 1 tsp. salt
– 2 large eggs
– 1½ cups vegetable oil {I substituted 1 cup applesauce}
– 1 cup buttermilk
– 2 tbsp. (1 oz.) liquid red food coloring
– 1 tsp. vanilla extract
– 1 tsp. distilled white vinegar

for the frosting:
– 4 ounces cream cheese, softened
– 1/4 cup unsalted butter, softened
– 2 cups confectioners’ sugar
– 1 tablespoon heavy cream
– 1/4 teaspoon salt
– 1/2 teaspoon coconut flavoring {optional}
– 1 teaspoon vanilla extract
– 1/4 cup sweetened shredded coconut

1. Preheat the oven to 350 degrees. Line cupcake pans with paper liners.

2. In a medium bowl, combine the cake flour, sugar, baking soda, cocoa powder and salt; whisk to blend.

3. In a large bowl, combine the eggs, vegetable oil {or applesauce}, buttermilk, food coloring, vanilla and vinegar. Beat by hand or with an electric mixer on medium speed until well blended.

4. Gradually mix the dry ingredients into the wet ingredients. Beat until the batter is smooth.

5. Fill the cupcake tins about 3/4 of the way full.

6. Bake 15-18 minutes, rotating the pans halfway through baking, until a toothpick inserted in the center comes out clean.

7. Let cool in the pans 5-10 minutes, then transfer to a wire rack to cool completely.

8. While cupcakes are cooling, make the frosting: Beat the cream cheese and butter in a mixer bowl until light and fluffy. Gradually add the confectioners’ sugar, one cup at a time, alternating with heavy cream. Beat in the salt, coconut flavoring, and vanilla extract. Continue beating until mixture is smooth and spreadable. Add additional confectioners’ sugar if necessary to thicken the frosting, or more cream to thin. Stir in the coconut.

9. Once the cupcakes have cooled completely, use a knife or a spatula to spread the frosting onto the top of each.

10. {Optional} I like to refrigerate the cupcakes for twenty minutes or so to let the frosting solidify.

Happy Friday! Have a wonderful weekend!

Always,
Dallas
————————
Time spent: about 1 hour {including bake time}
Cost: $5-$7

carrot cake with coconut cream-cheese frosting

I don’t know about you, but I loooooove cream-cheese frosting. I had never attempted to make some myself {I’ll admit it: I was intimidated} … whenever I made a cake I always chickened out and opted for the store-bought kind. But whenever I got a piece of red velvet cake or carrot cake from a bakery or restaurant, and the cream-cheese frosting was obviously homemade, it always tasted a million times better.

So, for Mike’s birthday, when I asked him what kind of cake he wanted me to make, he requested carrot cake … with cream-cheese frosting, of course! And I knew I had to try making the good homemade frosting for my sweetie.

I am SO glad I did! It was way easier than I expected, and sooooo delicious. This is now my go-to frosting for any cakes, cookies, cupcakes — you name it, I’ll frost it with coconut cream-cheese goodness.

Here is the recipe for both the carrot cake and the frosting. The carrot cake is relatively healthy as far as cake goes: no oil or butter; egg whites, applesauce, carrots. The frosting is not healthy in the least, but it is worth it!

carrot cake with coconut cream cheese frosting

cake:
– 6 egg whites
– 3/4 cup sugar
– 1 cup applesauce
– 1/2 cup skim milk
– 2 tsp vanilla extract
– 1/2 tsp ground cloves
– 1 tsp ground nutmeg
– 2 tbsp cinnamon
– 2 tsp baking soda
– 2 cups flour
– 2 cups shredded carrots
– 8 oz can crushed pineapple with juice
– 1/2 cup raisins {though I left them out because I don’t like raisins}
– 1/2 cup chopped walnuts {if desired}

frosting:
– 4 ounces cream cheese, softened
– 1/4 cup unsalted butter, softened
– 2 cups confectioners’ sugar
– 1 tablespoon heavy cream
– 1/4 teaspoon salt
– 1/2 teaspoon coconut flavoring {optional}
– 1 teaspoon vanilla extract
– 1/4 cup sweetened shredded coconut

directions:

1. Preheat oven to 350 degrees. Lightly grease a baking pan with cooking spray.

2. In a large mixing bowl, beat egg whites. Slowly beat in sugar, then applesauce, skim milk, and vanilla. Stir in cloves, nutmeg, cinnamon, baking soda, and flour.

3. Stir in, one ingredient at a time, pineapple (with juice), carrots, walnuts, and raisins.

4. Pour into the prepared pan. Bake for 35 – 40 minutes. Your cake is done when a fork inserted in center comes out clean.

5. While your cake cools, make the frosting: Beat the cream cheese and butter in a mixer bowl until light and fluffy. Gradually add the confectioners’ sugar, one cup at a time, alternating with heavy cream. Beat in the salt, coconut flavoring, and vanilla extract. Continue beating until mixture is smooth and spreadable. Add additional confectioners’ sugar if necessary to thicken the frosting, or more cream to thin. Stir in the coconut.

6. Once the cake has cooled, spread the frosting evenly over it with a knife or spatula. If you can bear the wait, pop the frosted cake in the fridge for half an hour or so to give the frosting time to set. I think this cake tastes even better the next day, after spending a night in the fridge!

Upon taking his first bite, Mike declared:

“BEST. CARROT. CAKE. EVER.”

Hooray!

Happy weekend & happy baking!
-Dallas

———————————-

Time spent: about 1 hour
Cost: $8.00