favorite halloween costumes

Happy Thursday, everyone! Hope you’re having a wonderful morning! My day today is pretty similar to yesterday: work on my novel this morning, do some editing work, and then teach this afternoon/evening. I don’t know about you, but for me this week is flying by!

Since we’re already halfway through October, I thought it would be fun to do a post about Halloween costumes! This year, Allyn and I are planning to dress up as Sebastian and the Little Mermaid. We’re not even sure what our Halloween plans are yet, but even if we’re just dressed up to pass out candy to trick-or-treaters, I’m still excited!

We found this crab hat for Allyn on Amazon. Paired with a red shirt, he’s set!

Though Allyn was joking that he should get this King Crab costume… if only it wasn’t so expensive! Too bad, haha.

I was excited to come across these inexpensive mermaid leggings. They’re comfortable, not too thin, and cute enough to maybe even wear again underneath a skirt for a unique going-out look.

I’m planning to pair them with a tankini top, and then I just need to find a red wig and I’ll be set!

Here are some of my favorite costumes from past Halloweens:

Last year I dressed up as Minnie Mouse, which is a super easy costume if you have a polka-dot dress. All you need to do is don some mouse ears and draw a nose on with eyeliner pencil. I didn’t have any Disneyland Mouse Ears, so I made some of my own by pinning a red bow to a pair of mouse ears I bought from one of those Halloween outlet stores.

minnie mouse

Another easy costume is a pirate. I did this one Halloween when I was in grad school. Wear a striped shirt, a vest, and a pirate hat, and you’re golden! If you want to jazz it up you can add a hooked hand, a sword, or a stuffed animal parrot on your shoulder!

Halloween costume

In college, my roommates and I had fun coming up with linked costumes. One year, my friend Jess was a pirate and I wore a gold dress and was her pirate’s treasure! I think this would be a really cute couples costume 🙂

college halloween 2

The group photo of us below is a little far away, but I couldn’t resist sharing it because of the kids’ crazy expressions in the foreground! This was when we took my friend Celine’s little brother trick-or-treating.

college halloween

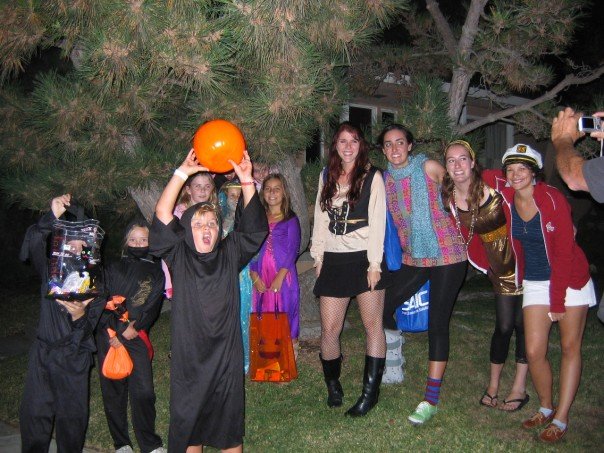
Ha! Those kids are seriously hyped up on candy.

Another easy costume is a cowboy or cowgirl. When I was in college and studied abroad in England for a semester, there were themed dances nearly every week — and the British students got REALLY into dressing up! It was a blast. Whenever I didn’t know what to dress up as, a cowgirl was a super easy option. Just throw on some comfortable jeans, a plaid shirt, a cowboy hat, and boots! Here’s a photo circa 2007 of me dressed as a cowgirl with my friend Jamie dressed as a {very convincing!} vampire.

cowboy and dracula

When I was growing up, my favorite costumes were homemade. I have a fond memory of spending lots of time with my dad painting cardboard wings rainbow colors one year when I dressed up as a butterfly. Another year I went as a sunflower {are you surprised? lol} and made a sunflower out of yellow poster board. I cut out a circle in the middle and stuck my face through it, so the petals encircled me and my face was the center, and then I wore green leggings and a green shirt. I remember getting lots of compliments on that costume when I went trick-or-treating!

If you have costumes lying around that you’re not planning to wear again, especially children’s costumes, consider donating them to Goodwill for others to wear. Also, here is a neat nonprofit I recently heard about that donates costumes to kids in need: Ween Dream.

Questions of the morning:

  • Are you dressing up for Halloween this year?
  • What are your favorite costumes from past Halloweens?
  • If you have kids, what are they dressing up as?

guest post on AndreaDekker.com!

Hi everyone! I’m excited to share that my guest post “A Random Acts of Kindness Challenge” is being featured on one of my favorite blogs, AndreaDekker.com! In the post I share five easy, inexpensive kind acts that you can do today to brighten the lives of others.

random-acts-of-kindness

Read it here: http://andreadekker.com/random-acts-of-kindness-challenge/

Happy Friday! Hope you have a lovely day and enjoy the long weekend!

organizing your car’s glove box

Happy Friday, everyone! I have a quick and easy organizational project for you today!

ezzie glove box

Remember a few months ago, when I posted about making the most of long car rides? I mentioned how I like to bring small projects I can do in the car, like knitting or bill-paying or even cleaning up the clutter that’s accumulated in the car.

Well, during one car ride I brought a small accordian file folder {from the $1 section of Target — I’ve used similar folders to organize my stationary and take-out menus!} and I organized the glove box while I sat in the passenger seat. Now all the important auto-related documents are together and accessible in one easy-to-find place!

glove box organizer

All you need for this project is some sort of small file folder and a pen to label each section. I made sections for important documents like the car registration and insurance, instruction manual, receipts from maintenance, etc. I also included a map of the area and a notepad and pen.

When I was done fitting the documents inside, the file folder closed up and fit perfectly in my glove box. Hooray!

Now I feel better than ever hitting the road, knowing that I have all my car-related documents in one easy-to-find place! This is a great example of a simple, quick, inexpensive organization project that makes your life easier and less stressful.

Have a super weekend, everyone! And if you have a moment, send up a prayer for all of those in my hometown area who are being affected by a raging wildfire, including the heroic firefighters who are battling the blazes.

my valentine’s day plans

valentines week

Happy Valentine’s Day!

My lunch today is leftover tilapia, veggies, and — to make things a little special! — a couple of red velvet crinkle cookies. I made them yesterday to deliver to the nursing home along with valentines for my Week 6 Year of Kindness Challenge, and they are just the way I like cookies to be: dense, chewy, soft in the middle and crispy around the edges. YUM!

red velvet cookies

After I finish teaching, I have plans for dinner and then a late show of the new Nicholas Sparks movie Safe Haven. I’m so excited!

safe haven

I came across this Valentine’s poster idea from Julie at PB Fingers and I wanted to show you this morning in case anyone is looking for a last-minute gift idea for their sweetie! This one is inexpensive, easy, and pretty dang adorable.

Here’s what you do: leave a trail of Hershey’s kisses from the doorway through the house to the bedroom. Then have a sign waiting like this one, surrounded by more Hershey’s kisses:

valentine sign

Isn’t that such a cute idea?

I’m going to sign off now and get going on my day! I hope your Valentine’s Day is filled with a ton of love, laughter, and of course chocolate! 🙂 What are you doing to celebrate today?

xoxo,
Dallas

other valentine’s posts you might enjoy:
– easy + inexpensive valentine’s day cards
– an adorable owl craft project
my favorite romantic movies
– 6 simple sweets to make your sweetie for valentine’s day
– hand-crafted valentine’s day decor

easy + inexpensive valentine’s day cards

Valentine’s Day is right around the corner — more specifically, next week! How does the time fly by so quickly?

I have always loved Valentine’s Day because I love an excuse to make a big deal about my friends and family. I love to show them that I care. Quite simply, I LOVE love! 🙂 And Valentine’s Day is the perfect reminder to appreciate those special people in your life and let them know how much they mean to you.

Over the next week, I’ll be doing a series of “Countdown to Valentine’s Day” posts with lots of ideas on how your can make your Valentine’s Day a masterpiece–whether you’re single, dating, engaged, married, or somewhere in between!

valentines week

When I was browsing the Valentine’s Day section at the grocery store a couple days ago, I looked through the adorable sets of cards available for kids to bring to their classmates and friends. I remember as a kid picking out cards with my favorite Disney princesses {I was a Belle girl all the way!} or Power Rangers {anyone else like the Yellow Ranger the best?} or, one year, Blue’s Clues. {I might have had a little crush on Steve.}

But gone are the days of simple paper fold-over cards. I had a great time surveying the shiny foil cards, the stickers, the sequins … but the price tags, whew! Those Valentines can get a little pricey, especially when you factor in candy and multiple children to buy card sets for!

That very same day, my blogging buddy Andrea over at Simple Organized Living ran a post called Two SO-Simple DIY Valentine’s Day Cards. I especially loved her idea about using Swedish fish {one of our Jude‘s fave candies} and a handmade card that reads, “I’m glad you’re in my school.” Seriously, how cute are these?

Another idea:

  • Purchase a pack of stickers featuring your child’s favorite cartoon or action figure. {You can find a great selection for a couple bucks at Toys R Us, Target, and most pharmacies or grocery stores in the card aisle.}
  • Pick up a pack of blank index cards.
  • Write out different Valentine’s messages onto the cards with bright markers.
  • Let your child decorate the cards with stickers.

This not only saves you money on cards, it also becomes a fun craft activity for your child. What better way to encourage empathy and compassion for others than writing kind words on Valentines?

You could also do a twist on cards by making them edible:

  • Bake a batch of cookies or cupcakes.
  • Frost them.
  • Before the icing hardens, press down one or two candy “Sweethearts” into the icing.
  • Your child gets to choose who gets what Sweetheart message.

cupcakes with candy hearts

What are some of your favorite Valentine’s Day memories? Do you have any inexpensive, handmade card ideas?

Till soon!
-Dallas

holiday white chocolate pretzels

How is your week going? Mine is flying by. It’s the last week of school before I head home to California for the holidays, and I am a mix of productive “aaack-so-much-to-get-done!” and lazy “it’s-December-and-I-just-want-to-bake-cookies-and-watch-Love-Actually.” Tonight I channeled both of these inclinations and baked festive white chocolate pretzel goodies to give to some of my friends and colleagues as Christmas gifts.

holiday masterpiece

I came across this recipe on one of my favorite blogs, Peanut Butter Fingers, and I tweaked it slightly because I couldn’t find the white chocolate wafer candies that Julie’s recipe called for. I just used plain chocolate and they turned out great!

DSC00015

Here’s all that you need:

  • pretzels
  • green and red M&Ms
  • small chocolate pieces {I broke apart these Andes peppermint white chocolate pieces}

DSC00019

Directions:

1. Preheat oven to 325 degrees. If desired, line a cookie sheet with parchment paper.

2. Spread a layer of pretzels over the cookie sheet.

3. Break chocolate apart into small pieces and place one piece in the center of each pretzel.

DSC00002

4. Bake for 3-4 minutes, until chocolate begins to melt.

5. Gently press a red or green M&M, writing-side down, into the chocolate.

DSC00003

6. Transfer pretzels to a plate and allow to cool.

7. When chocolate has hardened, store the pretzel treats in a tin or air-tight container.

DSC00018

I packed mine up in these cute tins I found at Target in the dollar section:

DSC00014

This is such an easy and inexpensive holiday baking recipe. These white chocolate pretzels are a special, home-made treat that your friends and loved ones will gobble up! {Or make a big batch for yourself — I won’t tell!} 🙂

Have a wonderful day,
-Dallas

——————-

-Time spent: 20 mins
-Cost: $6.00

*This post is linked up at I’m an Organizing Junkie as part of Menu-Plan Monday!

MPM-Winter

Here are the other posts in my “Make Your Holiday Season a Masterpiece” series:
homemade festive decorative chain
little oases of rest in a hectic, busy season


cilantro-honey salmon

I came across this recipe on the website All Recipes and I was intrigued by the tons of rave reviews. If you’re like me {unsure what a honey-cilantro marinade would taste like} … the answer is, AMAZING!

IThe sweetness of the honey contrasts really nicely to the cilantro and garlic flavors. Plus, it’s healthy {all those omega-3s!} and could not be easier to make. The original recipe is for grilled salmon, but I baked mine in the oven instead. I’m sure either way would be delicious!

cilantro-honey salmon

– 1 bunch chopped fresh cilantro
– 2 cloves chopped garlic
– 1/2 cup honey
– juice from one lime
– 2 salmon filets
– salt and pepper to taste

1. In a small saucepan over medium-low heat, stir together cilantro, garlic, honey, and lime juice. Heat until the honey is easily stirred, about 5 minutes. Remove from heat, and let cool slightly.

2. Place salmon steaks in a baking dish, and season with salt and pepper. Pour marinade over salmon, cover, and refrigerate 20 minutes.

3. Bake salmon at 375 degrees for 15-20 minutes, until salmon is firm to the touch and flakes easily with a fork.

I served mine with rice and a green salad. This salmon also goes great with these low-fat garlic cheddar biscuits!

Happy weekend!
-Dallas

——————————–

Time spent: 30 mins {including bake time}
Cost: about $10.00

low-fat garlic cheese biscuits

I am not the biggest seafood fan {I like some fish, but not really shrimp, crab, lobster, etc} … but I have always loved going to Red Lobster, even when I was a kid and ordered the chicken tenders, because of the amazing garlic cheese biscuits they give to every table. YUM! I always want to gobble down two or three biscuits before the food even arrives.

So I was thrilled when I found this recipe for garlic cheese biscuits on the terrific food website gina’s skinny recipes. I love the recipes Gina creates because they’re delicious AND low-fat. I decided to try this recipe as a side to the cilantro-honey marinated salmon I made for dinner the other night {my new favorite way to cook salmon; I’ll post it here next week!} It was my first time making any sort of biscuits, and they turned out great!

Here’s the recipe:

  • 2 tbsp butter, melted
  • 2 cloves garlic, minced {I used 2 tsp of pre-minced garlic in olive oil that I found at the store}
  • 2 tbsp fresh chopped parsley
  • 2 cups Heart Smart Bisquick
  • 1/2 cup shredded sharp cheddar cheese {I got the reduced fat kind}
  • 2/3 cup fat free milk

1. Preheat oven to 400°. Line a cookie sheet with parchment paper.

2. Melt butter in a small frying pan, add half the garlic and saute on low heat about 1 minute. Remove from heat and add parsley.

3. In a large bowl, combine biscuit mix, cheddar cheese, and remaining garlic. Stir in milk and mix (do not over mix). Drop batter by heaping tablespoonfuls onto prepared cookie sheet.

4. Bake for 10 minutes. Brush or drizzle biscuits with melted parsley/garlic butter. Bake for 5 more minutes, or until lightly browned on the bottom.

These biscuits are delicious warm from the oven, and I actually thought they were even more flavorful warmed up the next day. Just store any leftovers in a plastic bag or wrapped tightly in aluminum foil. You can also freeze the batter if you’d like — then all you have to do is pop it in the oven and you’re good to go!

YUM! Please make these and share them with those you love! ❤

Always,
Dallas

—————————–

Time: 15 minutes
Cost: $3.00

marvelous monday: good morning sunshine muffins

Hi everyone! Happy Monday! How is your week going so far? Grrrreat I hope! ❤ It’s been H-O-T here but I am trying to remember all the snowy winter days when I was aching for sunshine … it makes me feel grateful for these blazin’ summer days! {I am also grateful for A/C and electric fans!}

I have a recipe to share with you that I hope will brighten your week. I call these muffins “good morning sunshine muffins” because they are yummy, healthy, and guaranteed to give you some up-and-at-em energy and bring a smile to your face. {And also because one of my favorite things to hear in the morning is, “Good morning, sunshine!” How can that not get your day off to a good start?}

I adapted this recipe from this one for Oat Flour Morning Glory Muffins.

good morning sunshine muffins

-3 egg whites
-3/4 cup unsweetened applesauce
-1/2 cup plain yogurt {I used plain Greek yogurt for some extra protein}
-2 tsp vanilla
-2 cups flour {you could use whole wheat flour or oat flour if desired; I just used plain white flour because it’s what I had on hand}
-1/2 cup rolled oats
-1 & 1/2 tsp baking powder
-1 tsp baking soda
-1/2 tsp salt
-1 tsp ground ginger
-2 tsp cinnamon
-1 cup shredded carrots
-1/4 cup chopped walnuts
-1/2 cup flaked coconut
-1/4 cup honey

1. Preheat the oven to 375 degrees. Spray a muffin tin with nonstick spray.

2. In a large bowl, whisk together the egg whites, applesauce, Greek yogurt, and vanilla.

3. In a separate bowl, combine the flour, rolled oats, baking powder, baking soda, salt, ginger, and cinnamon. Slowly add the dry ingredients to your applesauce mixture. Mix well.

4. Add your carrots, coconut, walnuts and honey.

5. Pour batter into muffin cups and bake for 15-20 minutes, or until an inserted toothpick comes out clean.

YUM!

Have a marvelous Monday!

-Dallas

quick bathroom organization

I have a confession to make: I have a cluttered bathroom sink.

I am still using {and loving!} the toiletry organization system I put up on the back of the door using a shoe organizer — it’s the perfect way for me to store extra toiletry items, medicine, and items I don’t use all that often.

But what about the items I use every day? As you can see, they were completely cluttering up my countertop, creating a totally stressful environment and making it a big chore to clean.

My inspiration came from actually right across the bathroom: my shower. The tub used to be cluttered with various shampoo and conditioner bottles, body soap, shaving cream, etc. Then I found these vertical shower shelves and {hooray!} the result is a much more organized shower with all my products within easy access.

All it took for me to transform my cluttered bathroom sink was this $1 navy blue shower caddy. All I had to do was plop all my everyday-use toiletry products in the basket, wipe down the sink, and it’s like a whole new bathroom!

I’m really pleased with the transformation! And it is so much easier to clean now. All I need to do is pick up the basket, wipe the counter down, and put it back. Easy peasy!

Have you ever struck upon a cheap and simple solution to transform a cluttered space?

Have a great weekend!
-Dallas

———————————–

Cost: $1.00
Time spent: 5 mins