chocolate pumpkin-spice kiss cookies

I have a simple, delicious recipe to share with you today! These cookies are easy to make, come together in a flash, and would be the perfect holiday treat for a party or get-together. I brought them to a BBQ this past weekend and they were a big hit!

I got the idea for these cookies when I came across these babies at Walgreens after getting my flu shot: pumpkin spice Hershey’s kisses!

pumpkin spice hershey kisses

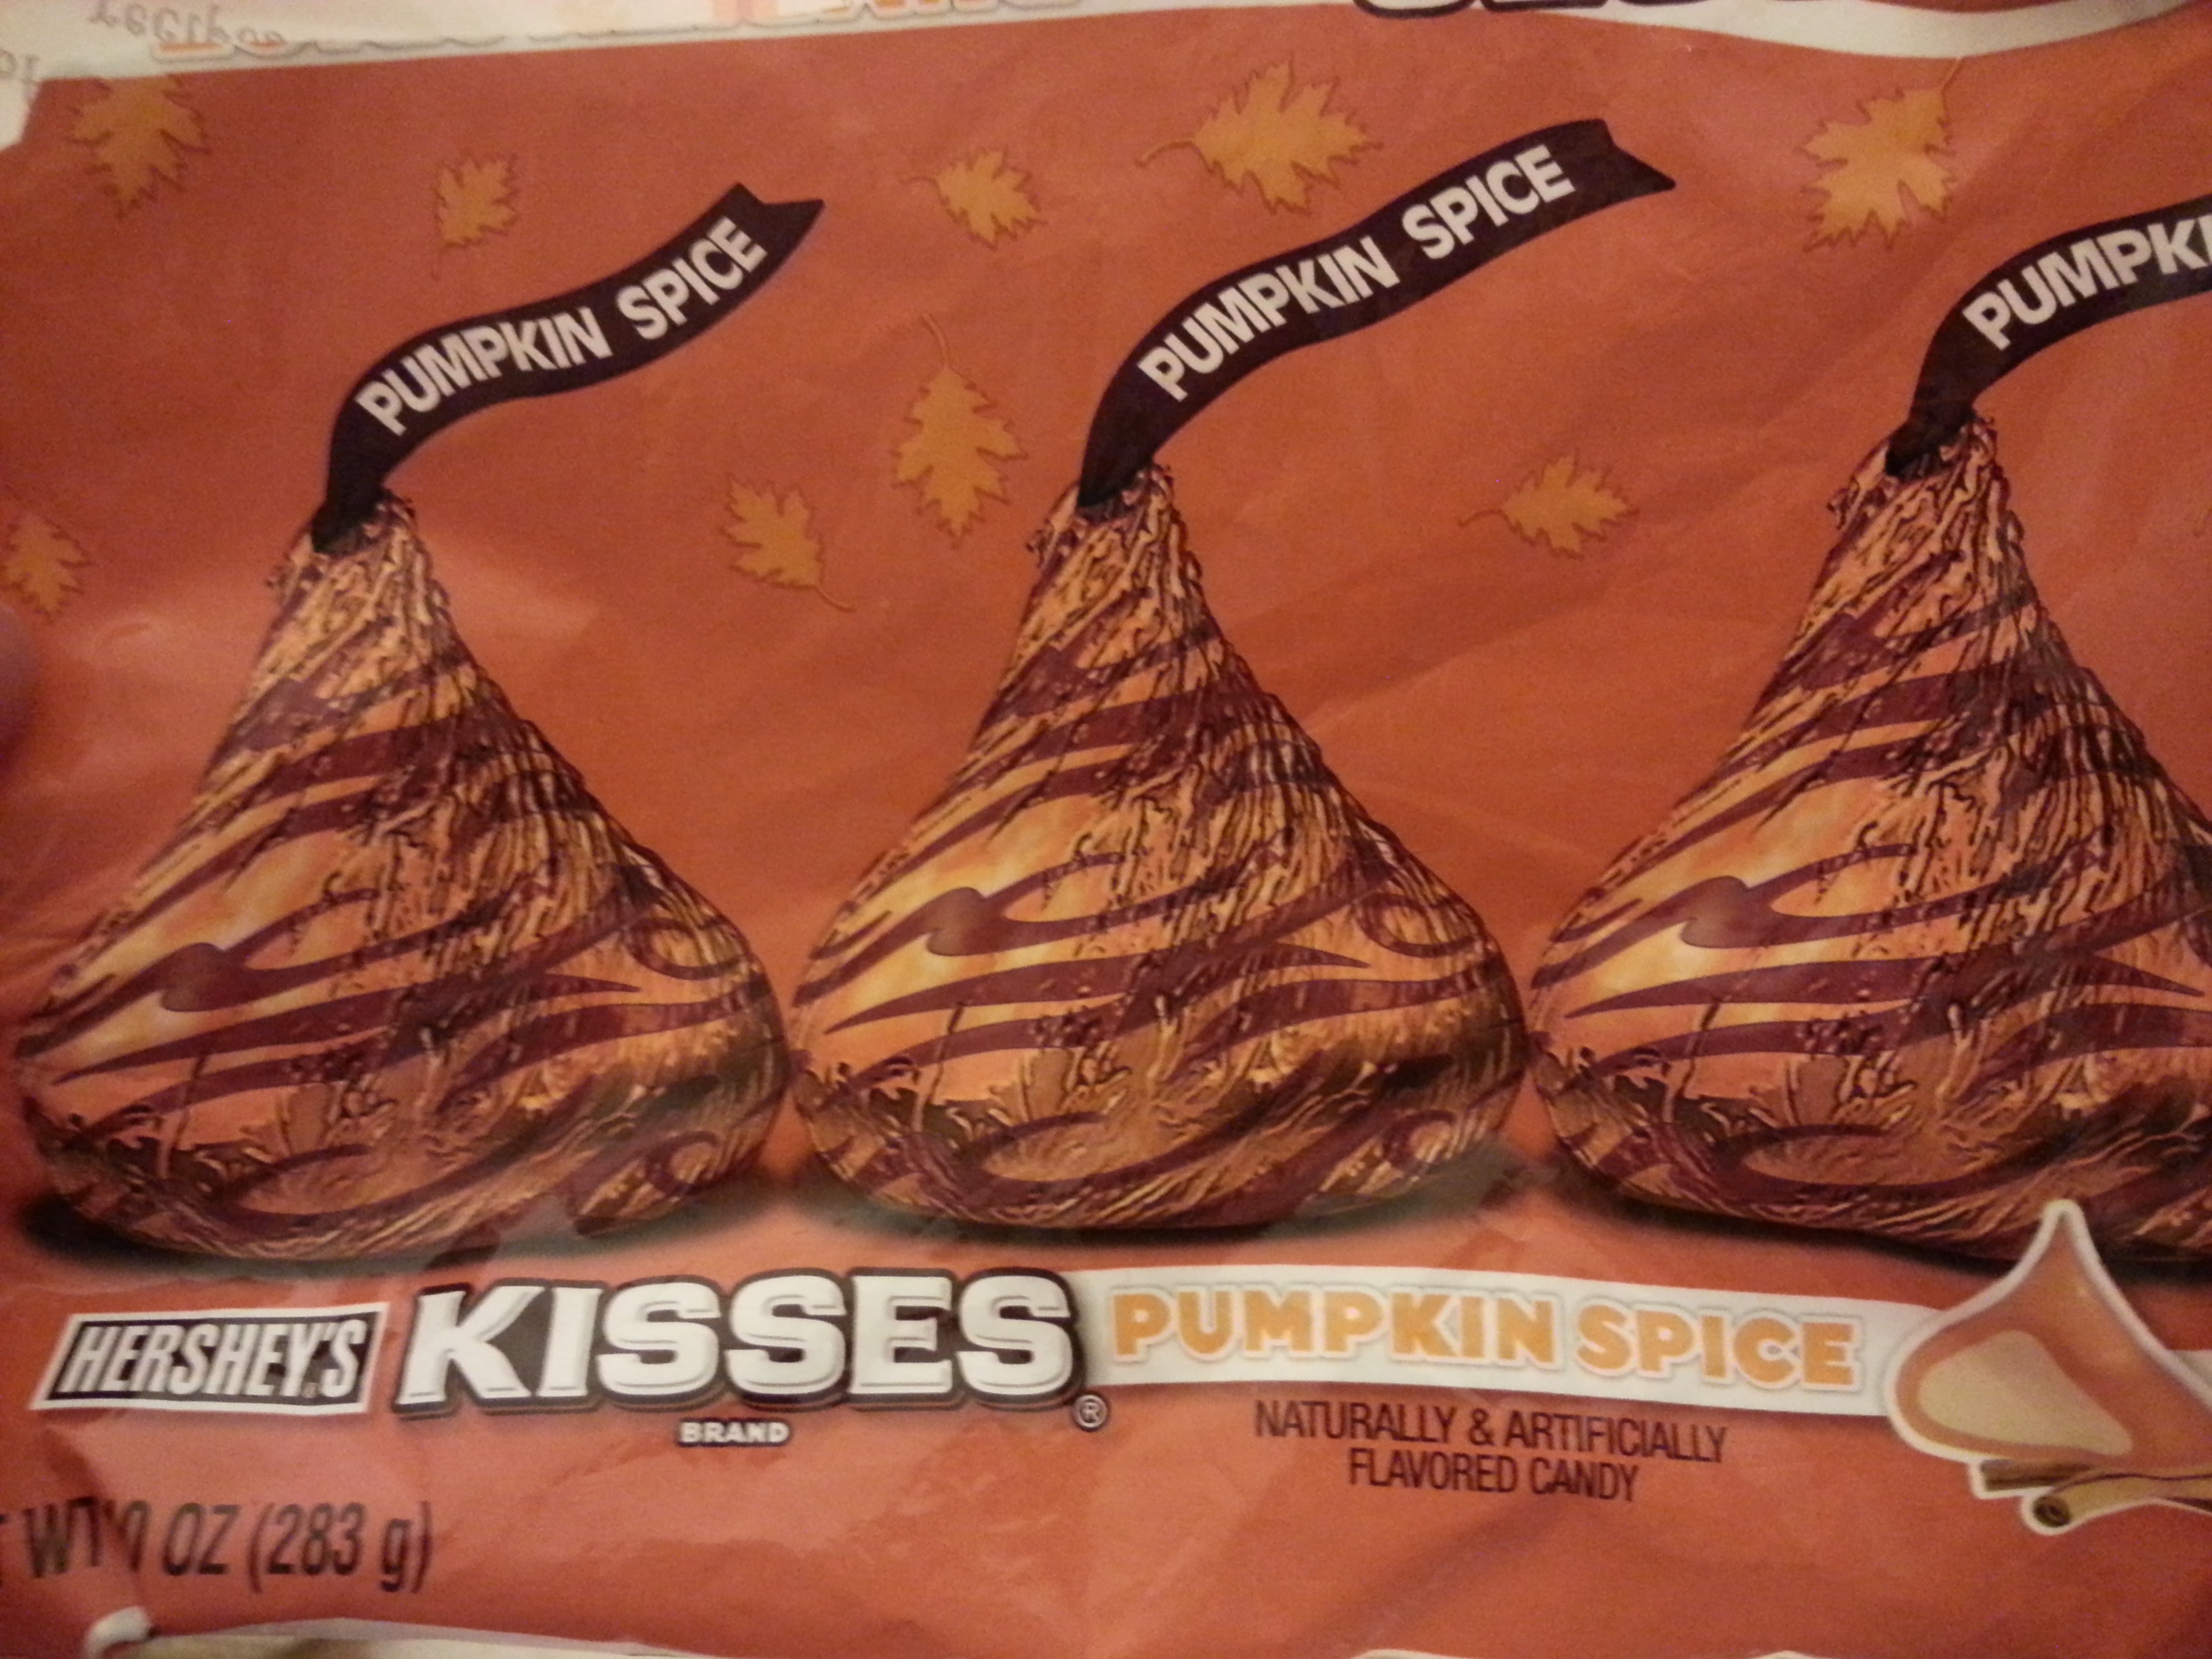
I was intrigued and they were on sale, so I scooped them up! When I got home, I started brainstorming what I could bake with them, and I thought about the cookies my mom makes during the holiday season using chocolate Hershey’s kisses. I thought I could make a similar cookie — except with pumpkin spice kisses, I decided I wanted a chocolate cookie base.

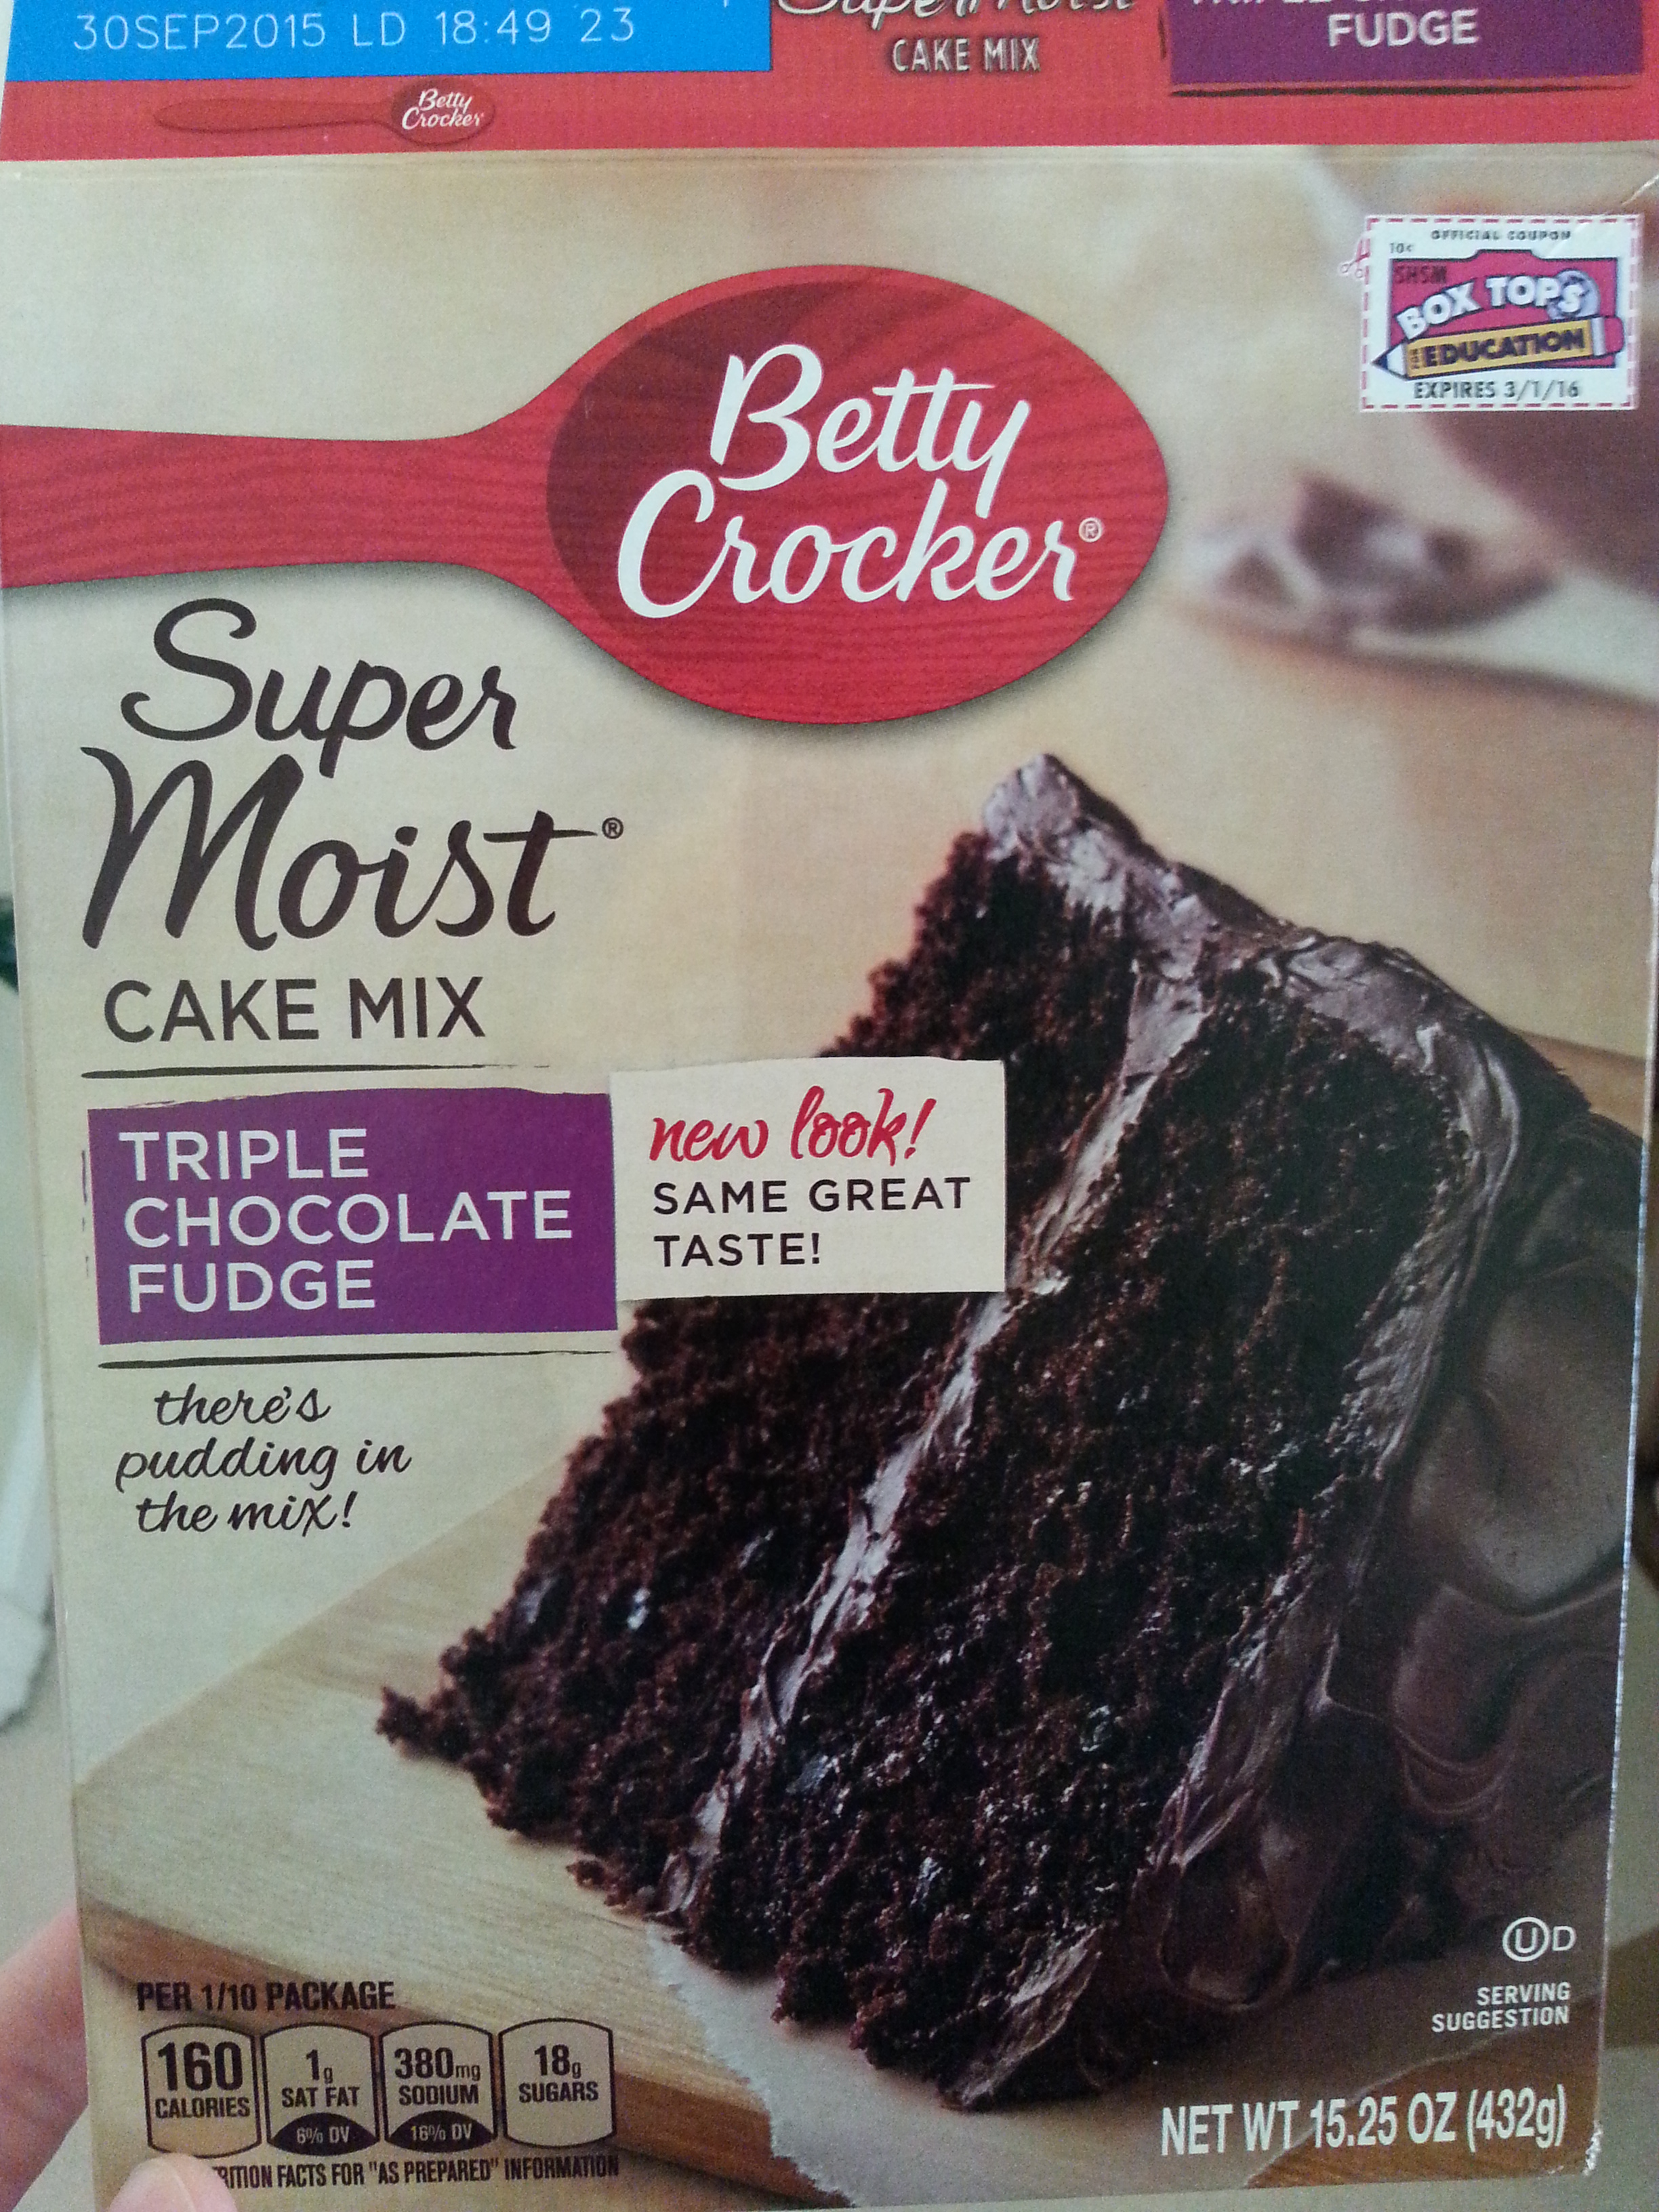
Rummaging around in my pantry, I found this.

chocolate cake mix

So I decided to make chocolate cake-mix cookies {similar to the funfetti cookies I made for Grandpap’s birthday two years ago.} I love cake-mix cookies because they are dense, soft and chewy. Yum!

I was able to whip these cookies up in about half an hour, and they turned out great! If you don’t have Hershey’s kisses, I think just making the chocolate cookies would also be a hit. Add in some peanut-butter chips and you’ve really got it made! 🙂

chocolate kiss cookies

chocolate pumpkin kiss cookies

– 1 box chocolate cake mix {I used triple-chocolate fudge; I bet devil’s food would be good, too!}
– 1/3 cup vegetable oil
– 2 eggs
– 1 cup chocolate chips
– pumpkin spice Hershey’s kisses

1. Preheat oven to 350 degrees.

2. Combine cake mix, oil, eggs and chocolate chips in a large bowl. Dough will be stiff and sticky.

3. Cover bowl with plastic wrap and refrigerate for 15-20 minutes, to allow dough to become easier to handle.

4. Drop rounded tablespoons of dough onto an ungreased cookie sheet, about 2 inches apart. {Note: these cookies EXPAND quite a bit! My first batch, I made the dough balls much too big. Just a tablespoonful is enough, I promise!}

5. Bake for 9-11 minutes, until cookies are set.

6. Remove from oven and cool in pan for 1-2 minutes, then transfer to a wire rack to cool completely.

7. While cookies are still warm, gently press a pumpkin spice kiss into the center of each one.

chocolate kiss cookies

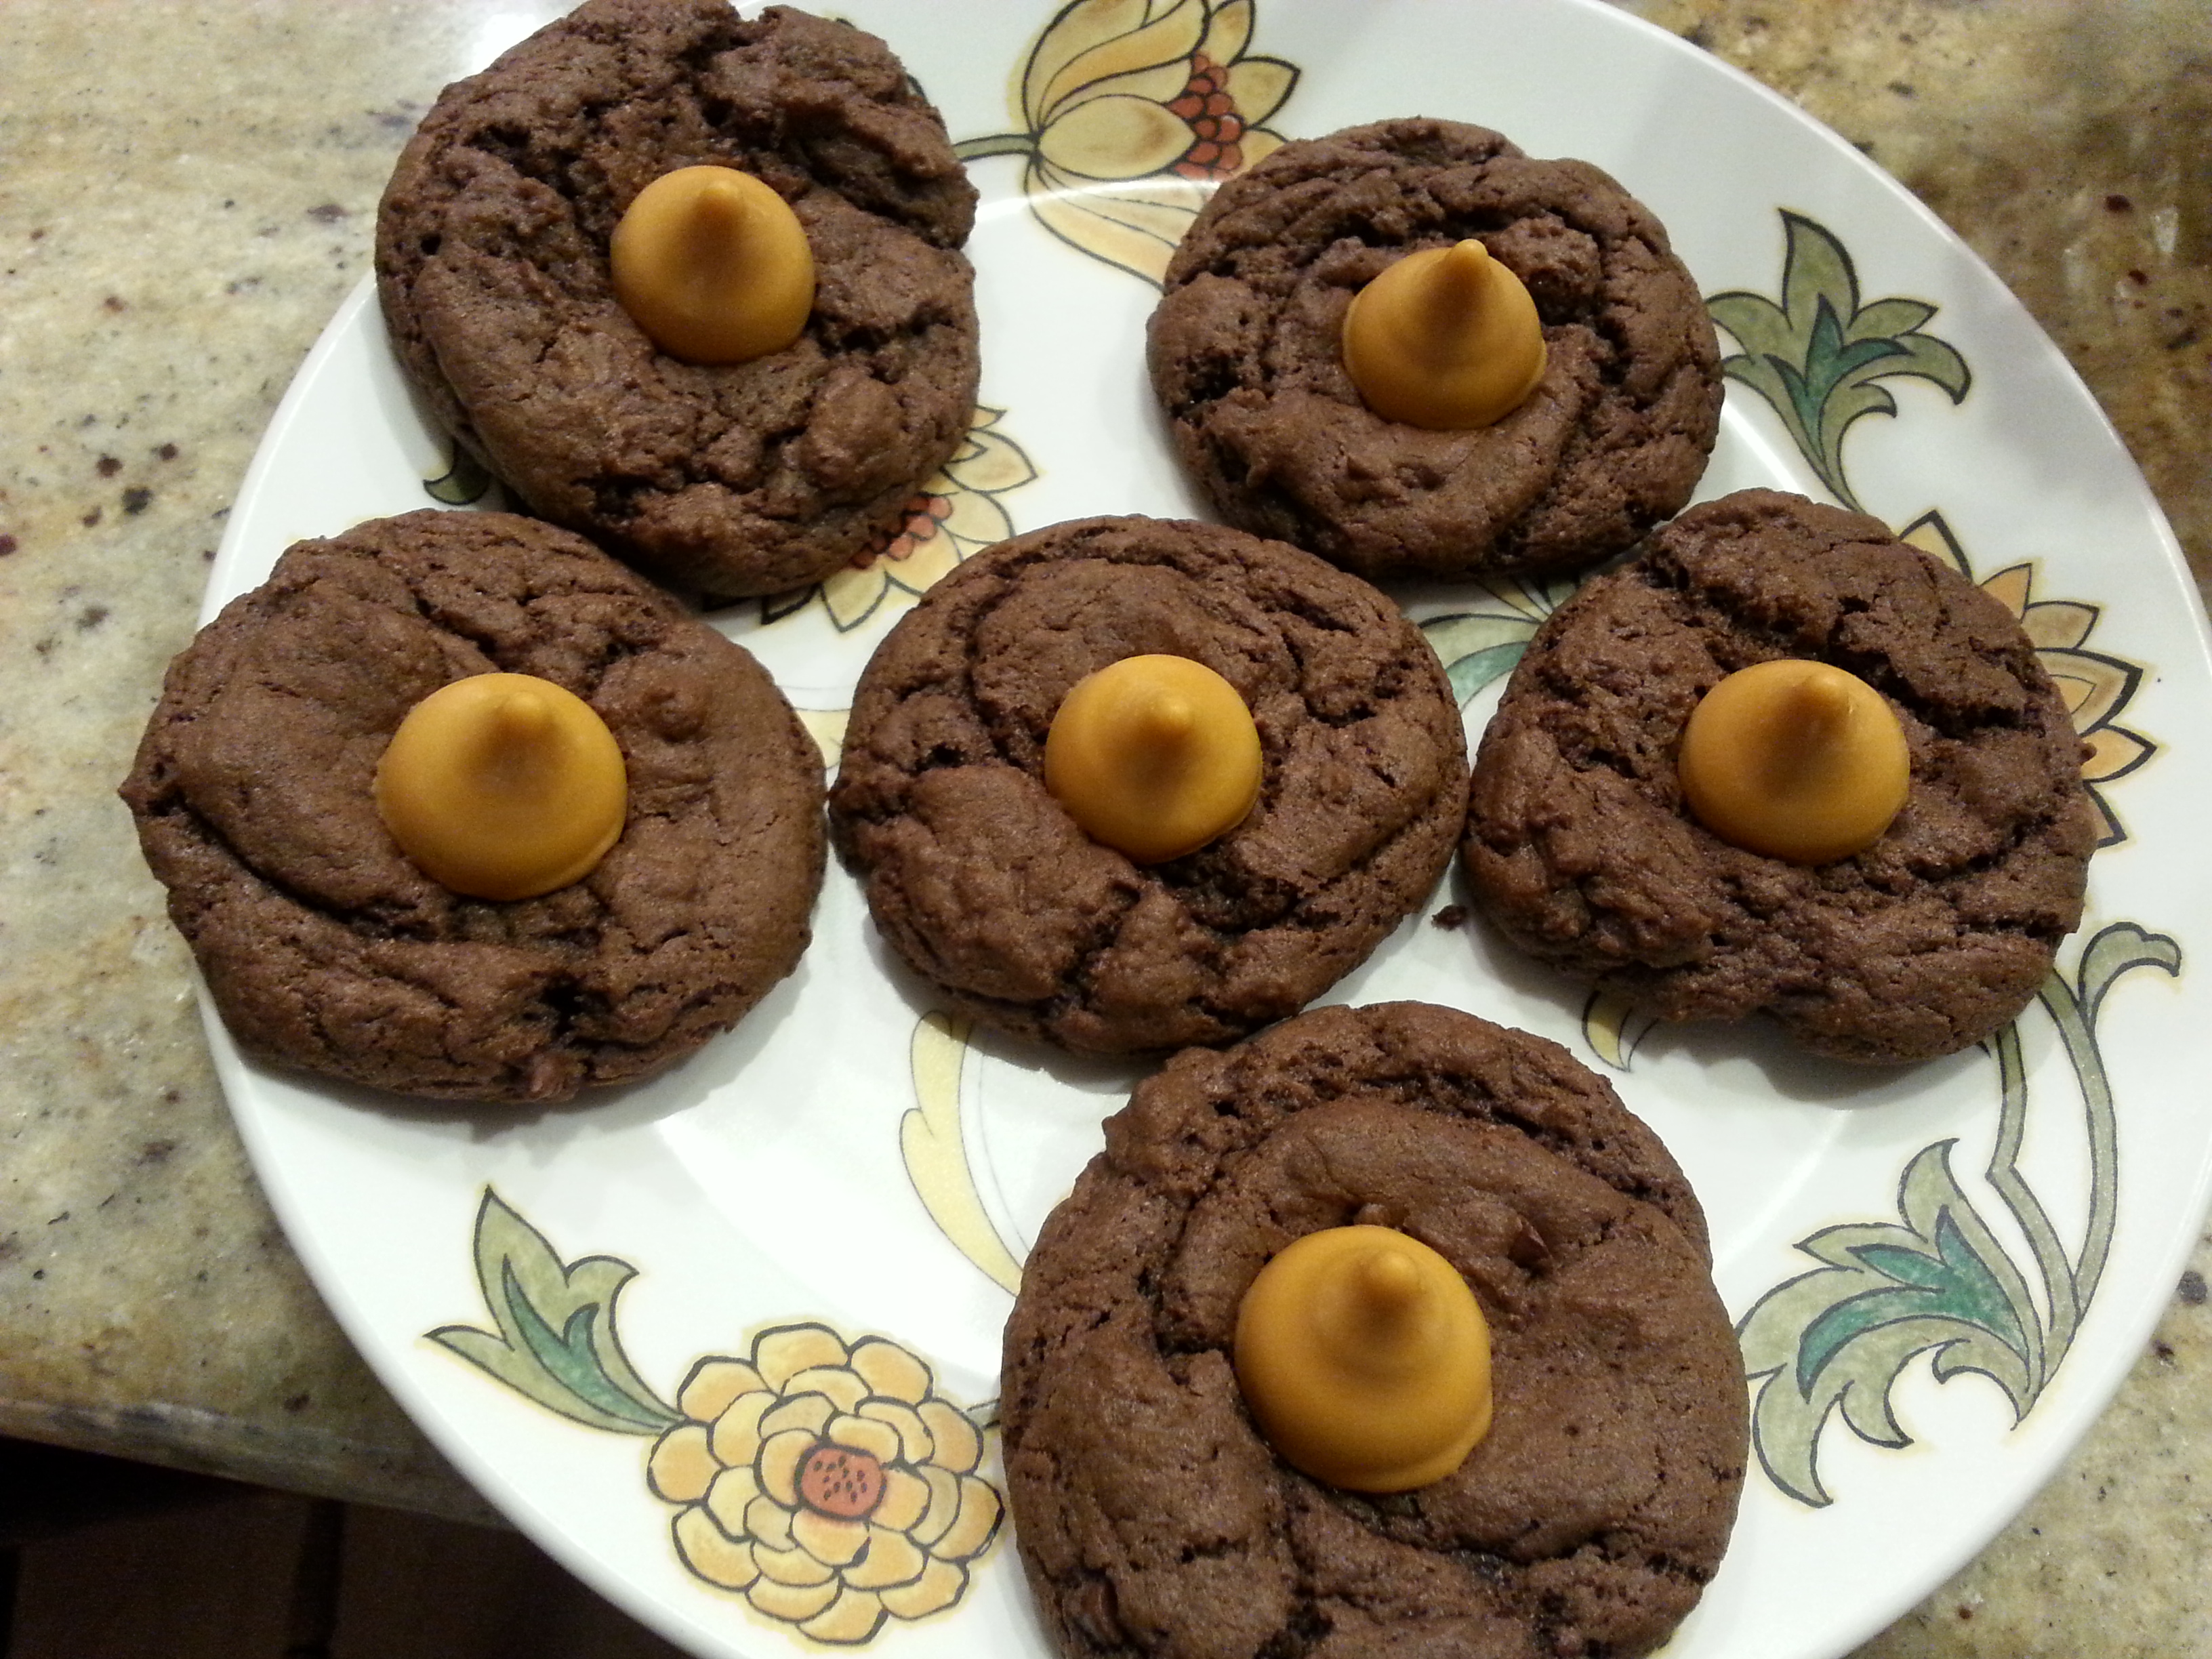
You can easily adapt these cookies based upon your favorite Hershey’s kiss. I think using a peppermint kiss or white-chocolate kiss would be divine!

If you liked this recipe, you might also enjoy:
aunt elaine’s peanut butter blossoms
pumpkin spice cake mix cookies
eggnog cookies with buttercream frosting

pumpkin spice cupcakes w/cream-cheese frosting

Well, the Giants got a smack-down last night. It was pretty pitiful.

But Dana and I still had a fun time chowing on deep-dish pizza, catching up {we ended up talking more than watching the game, since the game was so depressing} and playing with her adorable new kittens, Sadie and Hunter! They are so inquisitive, full of energy, and TINY! Here’s a photo I snapped of Sadie cuddled up on Dana’s lap.

sadie

So soft and fluffy! I couldn’t stop petting her.

One good thing about the evening was that at least we had yummy baked goods to help ease our sorrows!

baseball cupcakes

These cupcakes might not have been very lucky, but they sure were delicious! And super easy to make. I got some requests on Instagram for the recipe, so I thought I would share it on here!

My secret weapon: Trader Joe’s pumpkin bread mix. This stuff is amazing! Hands-down my favorite baking mix ever. And it’s seasonal, so stock up while you can!

trader joes pumpkin bread

I’m sure you could use a different pumpkin spice baking mix in a pinch, or make pumpkin muffins from scratch — here’s a recipe I love from Snixy Kitchen.

pumpkin spice cupcakes w/cream-cheese frosting

– 1 package Trader Joe’s pumpkin bread mix
– 2 eggs
– 1 cup water
– 1/2 cup vegetable oil
– 4 oz cream cheese, softened {I used 1/3 reduced-fat kind}
– 1/4 cup butter, softened
– 1 & 1/2 cups powdered sugar

1. Preheat oven to 400 degrees F.

2. In a large bowl, combine baking mix, eggs, vegetable oil and water. Mix until well combined.

3. Pour batter into a muffin tin lined with paper cups. In order to make these rounded baseball cupcakes, I filled the cups all the way to the top with batter. If you would like flatter cupcakes, fill the cups 3/4 of the way full.

4. Bake for 18-22 minutes, until a toothpick inserted in the middle comes out clean. Remove cupcakes from the muffin tin and set on a rack to cool.

5. While cupcakes are cooling, make the frosting: using a mixer, beat together the softened cream cheese and softened butter until smooth and well-combined.

6. Slowly add the powdered sugar, combing well after each addition. I used approximately 1.5 cups, but you can increase or reduce the amount depending on desired sweetness.

7. If frosting is too thick, you might need to add a little heavy cream or milk to thin it out, but I love my frosting thick, so I didn’t add any.

8. When cupcakes are completely cool, use a knife to generously spread them with frosting. To make baseballs, use a red gel frosting to make dotted lines in two half-moons, like the threading on a baseball.

baseball cupcakes

ENJOY!

In the meantime, I’ve got my Giants spirit going all day today! Game 7! Let’s go, San Francisco! 🙂

giants spirit

Questions of the day:

  • Are you watching the World Series? Who are you rooting for?
  • What is your favorite autumn dessert?

favorite halloween costumes

Happy Thursday, everyone! Hope you’re having a wonderful morning! My day today is pretty similar to yesterday: work on my novel this morning, do some editing work, and then teach this afternoon/evening. I don’t know about you, but for me this week is flying by!

Since we’re already halfway through October, I thought it would be fun to do a post about Halloween costumes! This year, Allyn and I are planning to dress up as Sebastian and the Little Mermaid. We’re not even sure what our Halloween plans are yet, but even if we’re just dressed up to pass out candy to trick-or-treaters, I’m still excited!

We found this crab hat for Allyn on Amazon. Paired with a red shirt, he’s set!

Though Allyn was joking that he should get this King Crab costume… if only it wasn’t so expensive! Too bad, haha.

I was excited to come across these inexpensive mermaid leggings. They’re comfortable, not too thin, and cute enough to maybe even wear again underneath a skirt for a unique going-out look.

I’m planning to pair them with a tankini top, and then I just need to find a red wig and I’ll be set!

Here are some of my favorite costumes from past Halloweens:

Last year I dressed up as Minnie Mouse, which is a super easy costume if you have a polka-dot dress. All you need to do is don some mouse ears and draw a nose on with eyeliner pencil. I didn’t have any Disneyland Mouse Ears, so I made some of my own by pinning a red bow to a pair of mouse ears I bought from one of those Halloween outlet stores.

minnie mouse

Another easy costume is a pirate. I did this one Halloween when I was in grad school. Wear a striped shirt, a vest, and a pirate hat, and you’re golden! If you want to jazz it up you can add a hooked hand, a sword, or a stuffed animal parrot on your shoulder!

Halloween costume

In college, my roommates and I had fun coming up with linked costumes. One year, my friend Jess was a pirate and I wore a gold dress and was her pirate’s treasure! I think this would be a really cute couples costume 🙂

college halloween 2

The group photo of us below is a little far away, but I couldn’t resist sharing it because of the kids’ crazy expressions in the foreground! This was when we took my friend Celine’s little brother trick-or-treating.

college halloween

Ha! Those kids are seriously hyped up on candy.

Another easy costume is a cowboy or cowgirl. When I was in college and studied abroad in England for a semester, there were themed dances nearly every week — and the British students got REALLY into dressing up! It was a blast. Whenever I didn’t know what to dress up as, a cowgirl was a super easy option. Just throw on some comfortable jeans, a plaid shirt, a cowboy hat, and boots! Here’s a photo circa 2007 of me dressed as a cowgirl with my friend Jamie dressed as a {very convincing!} vampire.

cowboy and dracula

When I was growing up, my favorite costumes were homemade. I have a fond memory of spending lots of time with my dad painting cardboard wings rainbow colors one year when I dressed up as a butterfly. Another year I went as a sunflower {are you surprised? lol} and made a sunflower out of yellow poster board. I cut out a circle in the middle and stuck my face through it, so the petals encircled me and my face was the center, and then I wore green leggings and a green shirt. I remember getting lots of compliments on that costume when I went trick-or-treating!

If you have costumes lying around that you’re not planning to wear again, especially children’s costumes, consider donating them to Goodwill for others to wear. Also, here is a neat nonprofit I recently heard about that donates costumes to kids in need: Ween Dream.

Questions of the morning:

  • Are you dressing up for Halloween this year?
  • What are your favorite costumes from past Halloweens?
  • If you have kids, what are they dressing up as?

grandma’s tortilla soup

As I’ve mentioned on here before, one reason I love living with my grandma is getting to spend time with her in the kitchen — she is teaching me so many wonderful recipes! {such as: curried butternut squash & apple soup / asian chicken curried salad / apple cake with brown sugar glaze … mmm!}

Today I have a new recipe to share, one of my very favorites, perfect for the drizzly weather we’ve been having here lately:

grandma tortilla soup.jpg

grandma’s tortilla soup
– 2 tsp olive oil
– 6 scallions, thinly sliced
– 3 cloves garlic, minced
– 1 cup diced tomatoes {canned or fresh}
– 3 cups reduced-sodium chicken broth
– ½ cup chopped cilantro
– ½ tsp oregano
– ½ tsp salt
– 1 cup frozen corn kernels
– 2 tbsp fresh lime juice

1. In a large saucepan, heat 2 tsp olive oil over low heat.

2. Add half the scallions and the garlic and cook about one minute, until scallions are tender.

3. Stir in tomatoes, broth, ¼ cup cilantro, oregano, salt, and bring to a boil. Reduce to a simmer, cover, and cook ten minutes.

4. Add corn and cook another few minutes.

5. To serve, stir in tortilla chips, remaining scallions, cilantro, lime juice.

Bonus: this soup makes the house smell aaaaaamazing!! Enjoy!

tortilla soup

if you like this recipe, you might also enjoy:
savory pumpkin & kale stew
crock-pot chicken & veggie stew
shrimp & sausage stew
creamy blended cauliflower & potato soup

grandpap’s favorite cherry-cheese pie

grandpap birthday

For my Grandpap’s birthday this past weekend, we made him his favorite dessert: cherry-cheese pie! It was a big hit with my family, and I was surprised at how simple it was to make. This would be a great holiday dessert alternative to pumpkin or pecan pie!

cherry cheese pie

grandpap’s favorite cherry-cheese pie
– 2 eggs
– 1/2 cup sugar
– 2 tsp vanilla extract
– 1 & 1/2 cups sour cream
– 2 packages {8 oz each} cream cheese, softened {I used one regular package and one package of reduced-fat}
– 2 tbsp melted butter
– graham cracker crumb crust
– 1 can {21 oz} cherry pie filling

1. Preheat oven to 325 degrees.

2. Beat together eggs, sugar, vanilla, and sour cream.

bianca baking

3. Cut cream cheese into small pieces. Gradually add the cream cheese to the sour-cream mixture, beating well.

4. Beat in melted butter.

5. Pour cheese mixture into 9-inch graham cracker crust. Bake for 35 minutes, or until set in center. Will firm up as it cools.

pies in oven

cooked pies

6. Top with cherry pie filling; chill cherry cheesecake pie thoroughly before serving.

cherry cheese pie

Hope you enjoy as much as Grandpap did! 🙂

me and grandpap

you might also enjoy these recipes:
perfect pumpkin pie
blueberry pie
gluten-free apple pie bites

diy t-shirt pillow

Happy hump-day, friends! Hope your week is going wonderfully!

Back in August I promised to share a new craft project that I did to “upcycle” two t-shirts that no longer fit … sorry for the delay, but I bring it to you now! This might be a neat Christmas gift to get a head start on. It’s simple and straightforward — even if you don’t have much sewing expertise, I guarantee you can do this project!

diy tshirt

I made this t-shirt pillow for my brother {that’s one of his running icons, Steve Prefontaine, pictured on the front.} I made another pillow for myself out of an old, too-small t-shirt with a book-cover of Catcher in the Rye on the front. Both turned out great!

Here’s what you need:
– a t-shirt
– a needle and thread
– scissors
– stuffing*

* I went out and bought a bag of pillow stuffing from a craft store. But I also had some old, torn socks I wanted to upcycle. So I used scissors to cut up the socks into tiny pieces and mixed them in with the store-bought stuffing. It worked out very well and made the stuffing go further!

Directions:

1. Turn the t-shirt inside-out and mark with a pencil the dimensions you’d like your pillow to be. Use a ruler to draw the lines straight and even.

2. Pin the fabric just inside the lines so it will stay together as you sew.

tshirt inside out

3. Cut the extra material off the shirt {i.e. necklines, sleeves, etc.}

4. Sew three sides of the pillow, leaving the top open.

5. Turn the pillow inside-out and fill with your desired amount of stuffing.

6. Carefully sew the top of the pillow closed.

tshirt pillow

TA-DA! Now you have a fun, attention-grabbing, conversation-starting new pillow to display or to give as a gift.

you might also enjoy these crafty posts:
diy no-sew baby blanket
homemade photo collage poster
adorable homemade owl
upcycled gift containers

oven-roasted pumpkin seeds

Happy Tuesday! As promised in an earlier post, I have a quick & easy recipe to share with you today: oven-roasted pumpkin seeds. If you are someone like me who does not like to waste anything, this is a great way to get the most bang for your buck out of your carved Halloween pumpkins!

carved pumpkins

After you’ve scooped out all those slimy pumpkin guts, why not roast up the pumpkin seeds for a healthy and delicious snack or salad-topper? Pumpkin seeds are a terrific source of zinc, vitamin e, and a wealth of antioxidants!

oven-roasted pumpkin seeds

1. Preheat oven to 350 degrees and line a baking sheet with aluminum foil.

2. Rinse the seeds clean of all pumpkin goop.

cleaning seeds

3. Dry the seeds on a paper towel.

4. In a small bowl, stir 2 tbsp butter or coconut oil with the seeds until they are well-greased.

5. Spread out the seeds in one layer on the baking sheet. {We had enough pumpkin seeds to do two separate batches.}

seeds to bake

6. Season however your heart desires! We did one sweet batch {pumpkin pie spice + cinnamon} and one savory batch {garlic salt + ground pepper.}

7. Bake for 10-12 minutes, until seeds begin to turn golden brown at edges. Be careful not to overcook the seeds, because they burn quickly! Roasting pumpkin seeds reminded me a lot of cooking popcorn, where things can go from delicious –> disastrous in a very short time frame.

roasted pumpkin seeds

ENJOY! 🙂

gluten-free apple pie bites

apple week

Hi friends! Apple Week continues today with a recipe for apple pie bites, adapted from one I came across at The Washington Post online. Unfortunately I don’t have a picture of these babies … you’ll just have to trust me on this. They’re: 1) delicious; 2) easy to make; and 3) gluten-free! In other words, these apple pie bites are the bomb dot com.

For the crust:
– 1/2 cup gluten-free flour {I used coconut flour, which turned out very well}
– 1/2 cup almond flour or almond meal
– 1/2 tsp cinnamon
– 2 tbsp agave syrup or maple syrup
– 2 tbsp unsweetened applesauce
– 1/4 cup ice water

For the filling:
– 1 cup finely diced, skin-on apple
– 2 tbsp unsweetened applesauce
– 1 tsp vanilla extract
– 1 tsp agave syrup or maple syrup
– 1/2 tsp ground cinnamon

1. Preheat oven to 375 degrees. Lightly grease a mini muffin pan and set it aside.

2. In a medium bowl, whisk together the flour, almond meal and cinnamon. Add the maple syrup, applesauce and water; stir to form a soft dough.

3. Divide the dough evenly among the wells of the mini-muffin pan. Use your fingers to press down the dough so that it lines the bottom and sides of each well.

4. Now make the filling: stir together the apple, applesauce, vanilla extract, maple syrup and cinnamon in a separate bowl. Divide evenly among the dough-lined muffin pan wells, pressing down the filling so it is firmly packed.

5. Bake for 15 to 18 minutes; the edges of the tarts will be lightly browned and the filling will have settled a bit. Cool in the pan for 5 minutes, then use a fork to gently dislodge and transfer each tart to a wire rack to cool.

These are the perfect light dessert or portable snack! Happy baking!

—————-

you might also enjoy these recipes:
apple cake with crumb topping and a brown sugar glaze
baked sugar & cinnamon donut holes
melinda’s vegetable salad with apples, bacon & honey-apple vinaigrette

apple cake with crumb topping & brown sugar glaze

Hi everyone! I’ve decided to designate the next few days as Apple Week here on the blog! I have a few apple-themed recipes I’m excited to share with you, so I thought why not group them together in a single week … after all, no time of year says apple like autumn does!

apple week

Today, I’m excited to share the recipe for the apple cake I shared a teaser picture of in yesterday’s post. Grandma and I baked this cake for our dinnertime get-together at my aunt’s house, and it was a huge hit! There were only six of us there, and pretty much the entire cake got devoured by the time we left.

apple cake with crumb topping and a brown sugar glaze

apple cake

for the cake:
– 5 cups apples {peeled, cored and chopped}
– 1 & 3/4 cups flour
– 1/4 cup almond meal
– 2 tsp baking soda
– 2 or 3 tsp cinnamon {depending on your tastes}
– 1 tsp salt
– 3/4 cup brown sugar
– 1/4 cup maple syrup or agave
– 1/2 cup vegetable oil
– 1 cup applesauce
– 2 eggs
– 1 tsp vanilla

for the crumb topping:
– 1/2 cup flour
– 1/2 cup brown sugar
– 1 tsp cinnamon
– 2 tbsp butter

for the brown sugar glaze:
– 1/2 cup brown sugar
– 1 tsp vanilla
– 2 tbsp water

1. Preheat oven to 350 degrees. Lightly grease a 9 x 13 baking pan and set aside.

2. In a large bowl, stir together the brown sugar, maple syrup/agave, and chopped apples. Mix until apples are well coated with sugar. Set aside.

3. In a separate bowl, beat together eggs, vegetable oil, applesauce, and vanilla until well combined.

4. Sift together dry ingredients: flour, almond meal, baking soda, salt, and cinnamon.

5. Add dry ingredients to the wet ingredients and mix well.

6. Pour the batter over the apple-sugar mixture. Stir until well combined, then pour into the baking pan.

7. To make the crumb topping: mix together flour, brown sugar and cinnamon. Add butter in small pieces. Mix until you have a fine, crumbly mixture. Generously sprinkle the crumb topping over the apple cake batter.

8. Bake for approximately 45 minutes, until a toothpick inserted in the center of the cake comes out clean. {Note: your house will smell AMAZING when this is baking!}

9. While cake is baking, make your brown sugar glaze by combining brown sugar, vanilla and water in a small bowl. Stir until smooth.

10. Remove cake from oven and drizzle with brown sugar glaze, which will harden as the cake cools.

In my opinion, this cake is best served warm with a scoop of vanilla ice cream. Enjoy!!

———

like this recipe? you might want to also check out:
baked cinnamon french toast
incredibly easy pumpkin spice cookies
chocolate spice zucchini muffins
apple banana oatmeal muffins

gluten-free oatmeal chocolate-chip cookies

I have an easy recipe to share with you today — another winning gluten-free cookie!

gf chocolate oatmeal cokies

– 1/4 cup butter
– 1/2 tsp baking soda
– 1/2 tsp baking powder
– 1/2 cup brown sugar
– 1/2 cup agave or maple syrup
– 3 cups gluten-free rolled oats
– 1 cup chocolate chips
– 2 eggs
– 1/2 cup chopped walnuts
– 1 tsp vanilla
– 1 cup peanut butter

for chocolate drizzle:
– 1/2 cup chocolate chips
– 2 tbsp butter

1. Preheat oven to 350 degrees and line a cookie sheet with parchment paper.

2. In a large bowl, combine brown sugar, agave/maple syrup, and butter. Beat until creamy.

3. Add the eggs, vanilla, baking soda and baking powder and beat well.

4. Add peanut butter and mix.

5. Stir in oats, chocolate chips, and walnuts.

6. Drop by rounded tablespoons onto baking sheet and bake 10-12 minutes until lightly brown around edges.

7. To make chocolate drizzle: microwave chocolate chips and butter for 20 seconds. Stir until chocolate and butter and melted and well-combined, microwaving more if needed. {Be careful not to burn the chocolate!}

8. Once cookies are done, let them cool and then drizzle with melted chocolate.

Enjoy! I love these with a big glass of milk!